Deep striking is a high risk/reward technique that can get your units anywhere on the table, in one fell swoop. But when things go wrong, they can go very wrong, and on more than one occasion I’ve lost a 225 point unit of Obliterators to a bad scatter. For that reason I often take some 3 man chaos terminator squads so I only risk 105 points for a chance at a cheeky melta shot. But how should I be placing them when I deepstrike? Consider the following:
Chaos Lord Harleck Wynne faces a wall of Imperial Guard tanks. He has to deepstrike his terminators, as any walking squad or vehicle will be wiped out as it approaches. Where should his combi-melta armed Chaos Terminators be placed to minimise the risk of mishap? Where should they be placed to maximise the chances of getting into melta range? Where should they be placed to get a balanced risk of mishap versus melta range?

Ok, so deep striking is governed by scatter dice. It’s a 6 sided die with two ‘HIT’ faces, and four faces with an arrow. Place your model where you want him, and roll. If you get a HIT then you land on target, if you get an arrow, then you scatter 2d6 inches away in the direction indicated by the arrow. Because the distance is governed by 2d6, the distance follows a pattern already described here such that results of 7″ are the most likely and 2″ and 12″ are the least likely.
The arrows complicate matters as they don’t comply with the discrete probability that I normally use for these calculations, but we’ll touch on that later.
So, with two HIT faces out of 6, we have a 33% chance of landing on target, and a 67% chance of scattering. If we ignore direction for a moment, then we can take a look at the odds of how far you’ll deviate from your intended location:

That was pretty much as far as my analysis went until quite recently. This approach clouded my thinking, as I saw it as a straight up question of distance, so I may as well get super close to the enemy as the ‘most likely’ scatter distance was 7″. Case closed, right?
Wrong!
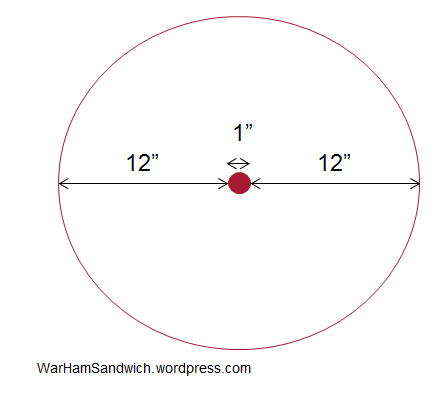
If you don’t get a HIT, then it’s all about the arrows. Let’s imagine a model with a 25mm base put on the table in his desired deepstrike position. He can scatter up to 12″ in any direction, so lets consider a 25″ wide circle as the total space we could end up in (e.g. up to 12″ to left + 1″base + 12″ to the right gives us the 25″, see below).

Time for a fancy graph. So I plot an area of 25″ by 25″, and represent the probability of landing at a particular point as a height, so we we get a sort of mountainous terrain where the highpoints are where you are likely to land, and the lowpoints are where you are unlikely to land. In the first instance lets look at the widest case. So you have a 33.3% chance of landing on target (i.e. a HIT), and a 66.6% chance of scattering. See below:

As you can see in terms of a single point, the target at the centre is far and away the single most likely final destination. In fact the difference is so extreme that all you can see of the scatter is some light ‘fuzz’ in a ring around the centre. So the first point to note is that if you do scatter it would appear that you could end up pretty much anywhere in that 25″ circle we described earlier. But that’s not particularly enlightening, so lets take a closer look at the ‘fuzz’.
I now remove the HIT from the chart, and the scale can then be changed to show the variation in odds for the scatter results. It’s worth noting that I didn’t solve this analytically so we don’t get a smooth and pretty set of results, we get a somewhat noisy set of peaks and valleys. But it’s still good enough to gain some insights and is still essentially representative of how it works in reality.

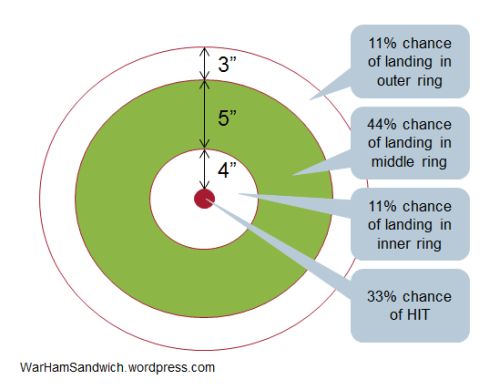
So as you can see from the dark blue peaks, the most likely area to scatter into is a ring around the target point, (specifically a ring with its edges about 5″ to 9″ away from the target point). This is an expected result from our knowledge that the scatter follows the same triangular shape of the old 2d6 chart. Do note how low the odds of landing at any particular point is: about 0.2% to 0.4%, tiny! Working through the numbers, here’s a simplified version:

So this is a lot of exposition and I haven’t addressed the opening question at all! What about those terminators?
Based on the calculations above, I carved out the probability of landing in a ‘safe’ area depending on how far away you place the terminators. But that in isolation is not enough. We want the terminators to land within 6″ of the tanks to get some hot melta goodness going. So here I’ve plotted the odds of landing safely for a given distance, and also the odds of ending up safe AND within melta range for a given drop point (i.e. the point you selected to drop at, not where you end up after scattering). So on this graph the x-axis is the distance from the tank wall you place the model initially, (i.e. before rolling for scatter).
The results weren’t quite what I was expecting going in, though do bear in mind that these findings are only true for the specific set up of the question – this graph isn’t a general rule for all deep strike situations!

So, what does this show? Well, assuming the parking lot of tanks is the only other unit in the area then unsurprisingly the further away you place them the less likely they are to scatter on to the enemy and mishap. But playing it safe won’t necessarily get you within the all important 6″ melta range. Here’s the interesting bit, I had originally thought that putting the terminators 1″ away from the tanks would get you the highest probability of being in melta range with a trade off of slightly higher odds of mishap. But I was quite wrong. The odds of getting safely in melta range stay pretty flat if you originally place the model between 1″ and 6″ away, but the odds of a mishap are about 45% at 1″ but fall to about 25% at 6″. So the tradeoff I mentioned in my opening question, doesn’t really exist – you can play it (relatively) safe and still go for the close range shot.
Lesson learned, drop those terminators about 5 or 6 inches away and you’re playing the right odds.
So how about a more general rule of thumb then? This specific case aside, how do we make better deepstriking decisions on the fly? In my opinion, the best general approach is to think in terms of area. Visualise the 25″ circle around any particular drop point (some assistance here and here), and then look at the friendly and enemy units in that circle. Now imagine a 1″ buffer around enemy units, and try to estimate what fraction of the circle’s area is covered by all the units and that buffer. This is key to estimating the risk.
I’ve illustrated a few simple examples below; in each case the centre of the circle is where you initially place the model (i.e. before rolling for scatter), and the red areas have units or other features (such as impassable terrain) that would cause a mishap (don’t forget the 1″ buffer around enemy units!). Do note I’m assuming that the centre point is a legal placement. Also note the maths below isn’t quite exact, but is good enough for tabletop guesstimation.

So there you have it – even deep striking right up into someone’s face is not quite as risky as it looks.
Tune in next time when I apply all of this to blast weapons…


