Tag Archives: d6

Fast Calls

In the heat of battle you have to make all kinds of on the spot decisions. Sometimes these are judgment calls with no analytically right or wrong answer – you just go with what feels right. However, sometimes even very good players do this in situations where a bit of thought would lead them to a definitively right choice.

For example, during the 2012 ETC, my opponent and I were discussing a cover save for a squad of my chaos marines. I contended that they were in 4+ cover, he said no. After some debate he offered me to ‘4+ it’ to determine if they were in cover, to which I offered a flat 5+ cover save which he accepted. In a later game the same situation arose with a squad of Obliterators, this time I agreed to ‘4+ it’. So here’s a simple question for you:

Was I right to take a different approach to two seemingly identical situations?

In the case of marines, they needed cover to have any save at all, rolling a 4+ to see if they are in cover of 4+ needs two 4+s which is only 25% likely. Arguing for a 5+ got me a 33% survival chance. So heres a rule of thumb, if your opponent offers a 4+ on 4+, offer a flat 5+. If an opponent asks for a 5+ get him to 4+ it instead.

Then why the change for the Obliterators? Well, like all good rules of thumb, you need to know your exceptions. The key difference is that if the Obliterators aren’t in cover, they still have their 5+ invulnerable – arguing 5+ cover would achieve nothing. I should roll for the 4+ to try for 4+ cover and if I’m not in cover then I can still use the invulnerable.

There was a similar situation against Imperial Guard. The IG order “Fire on my target” forces you to reroll successful cover saves. A quick bit of math and I chose the 5+ invulnerable vs 4+ cover, for the same statistical reasoning as before – a 33% chance of survival vs a 25% chance.

Whenever you find yourself in these kinds of situation, take a moment to think about it – because eking out a few extra percentage points can win you a tight game, and aren’t those the best victories?


Stacking the Odds Part II

The previous post on the probabilities for making lots of saves generated a bit of interest, and (as usual) some clever readers pointed out scenarios that should bear further analysis.  Altmann from the Penny Arcade forums asked:

“Can you work in the probability of making 4+ feel no pains as well? I know we’re getting into NASA shit but I’m curious”

Followed by Joe “Maynard” Cullen (of WarHeads fame) who pointed out that some wargear items also add complexities:

“The Wolf Tail Talisman gives a 5+ invulnerable save that happens before the armour save”

So in a similar fashion to my ultimate Ballistic Skill chart, I took it upon myself to rank the performance of a variety of armour types with rerolls, with Feel No Pain (FNP), and just plain regular saves.  This will give some insight into the relative merit of the saving throws we normally encounter in 40k.

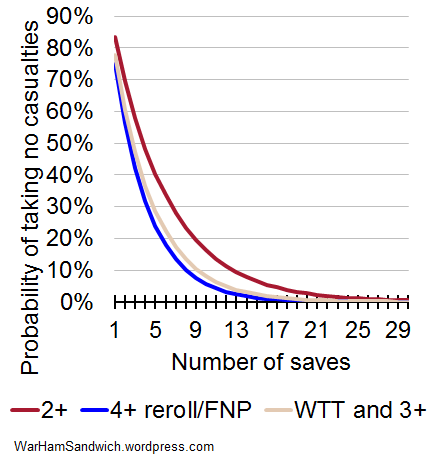
As with Stacking the Odds Part I, the chart shows how likely each type of save is to take no casualties from an increasing number of saves.

So chart number one:

This charts the various types of save (and combinations) showing the odds of taking no casualties for up to 6 saves (I cut it off at 6 as about half of them approach zero at this point).  The legend on the right shows the ranking from best to worst with a 2+ rerollable save being the best, and a regular 6+ save being the worst.  The sharper eyed in the audience may notice that some of the save types listed in the legend don’t show up in the graph – namely “5+ FNP” and “3+ FNP”.  Rest assured this isn’t an error, it is simply that they are coincidentally covered by other save types that perform identically.  So a 5+ with Feel No Pain save works out the same as a regular 3+ save, and a 3+ with Feel No Pain save works out the same as a regular 2+ save.

Or do they?

The calculations are correct, but you need to interpret the data in the context if the game itself.  So saving on a 5+ followed by a 4+ for FNP is statistically the same as a 3+, until you get hit by an AP5 or AP4 weapon, at which point all you get is the FNP, which is just a 4+ save (as you can see from the chart is a lot worse than a 3+).  The FNP could also be blocked by a high strength AP- weapon, leaving you with just a 5+.

In a similar vein, the 3+ with FNP is the same as a 2+, but what if they got hit by a battle cannon? the 3+ is negated by AP3, and (assuming we’re talking about T4 units) the FNP is negated by the instant death rule.  So no saves of any kind!  But a squad of terminators would still get their 2+ and (assuming that 5 are wounded by the blast) they have a 40% chance of taking no casualties at all!

So what about those opening questions?  Well Altmann was interested in the effect of FNP on terminators, and to show the difference I’ve scaled the number of saves taken up to 30, and dropped the weaker save types.

The effect is actually pretty strong, if we take say 20 saves, a regular terminator squad has only a 3% chance of being unharmed while the FNP terminators have an 18% chance (again assuming that they aren’t hit by something that negates FNP!)

Joe’s suggestion of the Wolf Tail Talisman (WTT) is charted below. Assuming the squad has power armour, then it works out quite close to (but slightly better than) a 4+ reroll, and worse than a 2+ save.

This should let you compare the various save types available to you, but don’t forget the context of how saves and FNP get negated! If there are any other save types you want to see included, then please do leave a comment.


Stacking the Odds Part I

This is a topic I touched on briefly before, but I think it’s time for a more comprehensive review.  As I’ve said previously, many players have bad instincts for how odds ‘stack up’, and I often hear comments like ‘if a terminator has to make 6 saves, you’d expect one to fail’.  Time to challenge some assumptions.

A squad of terminators come under bolter fire and have to take 6 saves, what is the probability that they take no casualties? A squad of marines come under a similar hail of bolter fire and also have to take 6 saves, what is the probability that they take no casualties?

At tournaments, and during club play, you may often hear cries of consternation as someone can’t believe that their opponent just made X number of saves in a row.  I think this ties in to certain types of (erroneous) expectations.  Nothing in this game of dice is certain; and you can never get a 100% guarantee of success.

That sounds pretty trite, and taken purely at face value, it is.  But I’m trying to get at something a little deeper.  If a terminator has to make ten saves, or a thousand saves, there is always a chancing of making it, but the odds don’t scale in the way that people expect.  Simply put: a thousand bolter shots is not one thousand times more likely to kill a terminator than one bolter shot; nor is ten bolter shots ten times more likely. As the number of saves to be taken increases, the odds of survival go down in an exponential way (for the non math types that means they start high, and gradually get lower but never quite reach zero).

Here’s one I prepared earlier:
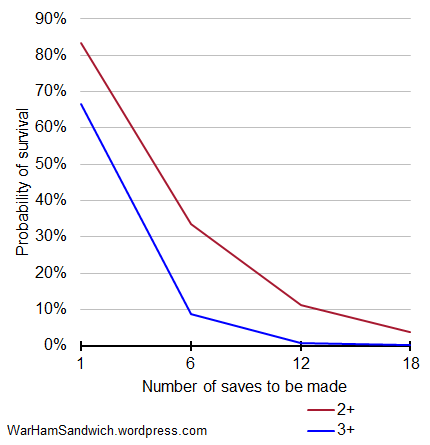
This graph shows how terminator armour and power armour behave as the number of saves to be taken goes up.  Terminator saves are in red, and marine saves are in blue.  The x-axis represents the number of saves that have to be made, and the y-axis shows the odds of the squad taking no casualties for the corresponding number of saves.

So this gives us the answer to the opening question.  If the termies have to take 6 saves, then there’s a 33% chance of them taking no casualties (i.e. find 6 on the x-axis and then look at the corresponding point on the y-axis for the red line).  The other group aren’t so hot, if the marines have to take 6 saves, then there’s a 9% chance of them taking no casualties.

If we extend the analysis a bit, the marines have only a 1% chance of taking no casualties from 12 saves, whereas the terminators have a more respectable 11% chance.  Even at 18 saves the terminators still have a 4% chance of walking away without a scratch.  Now 4% may sound like very long odds, but in truth its not far off the odds of getting a ‘perils of the warp’ result for a psyker.  So not something you’d see a lot, but hardly beyond belief.

One (slightly esoteric) point to note is that this is a ‘memoryless’ system.  This gets a bit subtle, but what I mean is that the current odds aren’t affected by what happened before.  So if a squad of terminators all survived 6 saves last turn and are now facing 6 more saves in this turn, the odds don’t stack to 11% (i.e. for 12 saves), they stay at 33% (for 6 saves).  Whatever happened in the past doesn’t affect your current action.

Now that we’ve covered some specifics, I’ve taken the liberty to graph the behaviour of saves from 2+ to 6+ when having to make up to 6 saves in one block.  Each coloured line represents a corresponding type of save from red for a ‘terminator’ save, blue for power armour, and so on through to the grey line for a 6+ save.
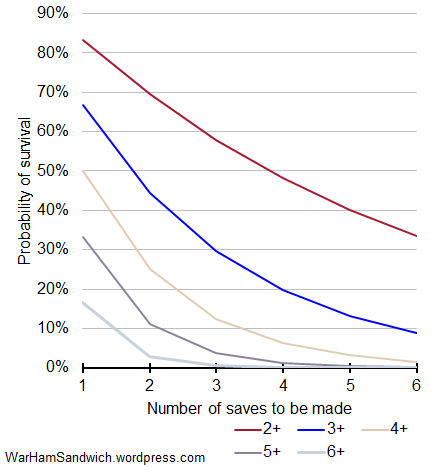
This follows the same pattern as the previous, it just shows more armour types.  But as an interesting illustration, based on the graph check out the following:

A terminator squad taking 6 armour saves has a 33% probability of taking no casualties

A terminator squad taking 6 storm shield saves has a 9% probability of taking no casualties

A terminator squad taking 6 cover saves (4+) has a 2% probability of taking no casualties

A terminator squad taking 6  invulnerable saves (5+) has a 0.14% probability of taking no casualties

Do keep this in mind the next time you fire your hydras at my obliterators!


The Joy of Penetration

5th edition games often feature a lot of vehicles, and understanding how best to crack open that armour and feast on the goo inside can be a crucial skill for any player.  With that in mind, here’s a question:

After some poor manouevring by your normally brilliant tank commander, your shiny new Leman Russ gets hit by a Lascannon, and by a Battle Cannon.  Which is more likely to penetrate?

The ambush continues, and the Russ is hit by a Demolisher Siege Cannon, and a Multimelta at close range.  Which of these is more likely to penetrate?

For most weapons, armour penetration is relatively straightforward, i.e. weapon strength + D6.  So, for example, a Krak missile can get results from 9 to 14 (not bad against a Rhino, but smacks of desperation against a LandRaider).  However many of the best Anti-Vehicle weapons don’t follow such a simple pattern.

For example, ordnance weapons roll two dice and pick the highest to add to the weapon strength, and melta weapons at half range get to add 2d6 to the weapon strength. This produces results that aren’t as simple, and can have a couple of quirks.

How does this apply to our terrified tank commander?

The interesting thing about the opening questions, is that it depends on what side the tank is hit from.

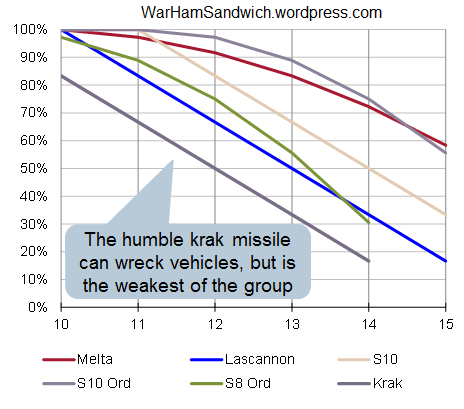
Let’s take the lascannon versus battle cannon first.  For a rear shot (AV10) the lascannon is more likely to at least glance, but the battle cannon is more likely to penerate.  For a side shot (AV13) the battle cannon is more likely to at least glance, but the lascannon is more likely to penetrate.  From the front (AV14) the Lascannon is the clear winner and is more likely to glance, and more likely to penetrate.  Not that the lascannon is remarkable against AV14 (with <20% chance of penetrating) it’s more that the battlecannon can’t pen Av14 at all!

It wouldn’t be a WarHamSandwich without some charts so let’s take a look at the comparison.  The graph shows the odds of getting at least ‘X’ for an armour penetration roll with each weapon.  So to get the odds of penetrating AV13, we look at the 14 result as this gives us the odds of getting at least 14 (the 13 result would get the odds of at least glancing).

So we can see a crossover from 10 to 11, and from 13 to 14 where the relative efficacy of each weapon against that AV switches.

So what about that second volley of shooting?
Again it depends on the angle. The Demolisher is more likely to penetrate against side and rear, but once we get to the front this flips and the multimelta becomes more likely to penetrate.  The crossover is clearly shown in the chart, below.

So what’s the point Vanessa?  There certainly are some comparisons where you can unequivocally say weapon X is better at anti-vehicle than weapon Y, but often it’s not so black and white.  With a bit of analysis you can pick the best tool for the job at hand.  Here’s a comparison of some of the common anti-vehicle weapons so you can gauge the relative merits against various armour values.

That said, this analysis doesn’t look at the end-to-end process, from hitting to penning to what you get on the damage chart.  I guess that will have to wait for next time…


Cut the BS

My last analysis on rerolls brought up a couple of questions from the audience, with comments mainly focusing on Ballistic Skill.  One in particular about the merits of the Vindicare assassin got me thinking about the how to evaluate shooting ability.  In line with my usual form, here’s a question:

A lowly guardsman stands in the open, he faces on one side, the mighty Eldar Phoenix Lord Fuegan Burning Lance (BS7) and on the other side Krazy Kullen (BS4) the weapon operator on a Chaos Rhino.  Fuegan’s melta weapon is obviously more potent than Kevin’s twin-linked bolter.  But who is more likely to miss?

Crazy Kevin

So my earlier treatise on rerolls only considered ‘normal’ rerolls where whatever you needed to get the first time was the same for the reroll.  Cunning commenter Caolan pointed out that at very high BS the shooter gets a reroll on a miss, but it’s not the same as the initial roll.  So a BS of 6 gets you a hit on a 2+, and  a 6+ reroll if you miss; BS7 gets the same 2+ to hit, with a 5+ reroll on a miss; BS8 is 2+ 4+; BS9 is 2+ 3+; and finally BS10 is 2+ 2+.

Rather than running the numbers in this post, have a look at my response to his comment at the bottom of this post.  But where I took it a step further this time is to calculate the odds to hit for BS1 to BS10 and for BS1 to BS5 with rerolls.  This gives us an interesting ranking of the relative accuracy of the BS values, and the impact of rerolls.  I’ve highlighted the rerolls in green to set them apart from the regular BS values.  The dark blue is the additional accuracy provided by the reroll (so under the dark blue is the basic odds to hit, the dark blue is the reroll, and the whole bar is the total accuracy).

Lo and behold the answer to our starting question appears before our very eyes.  It turns out that Eldar Phoenix Lords at BS7, are only as accurate as Chaos Rhinos with BS4 twin-linked bolters.  They are equally accurate. Who knew that Krazy Kullen was such a marksman?

What really comes through for me is how good BS4 rerolls are.  I’m known to have a fondness for Obliterators, and with twin-linked plasma AND melta at BS4 you can really see why.  More generally we can see that a reroll is better than a 1 point improvement (or more!) in BS for all cases except BS1 – but I think that’s a fairly well known thing already.

That said, you now have the definitive list from BS10 to 1 with rerolls, use it well my friends.


Take your chances

With the outcome of almost every ingame event determined by the toss of dice, a grasp of probability is an essential tool in Warhammer 40,000. How do you give yourself the best chances if you can’t work out the odds? This post will give you basics of the probabilities associated with common rolls. But for now, I’ll open with a question:

5 space marines rapid fire their bolters at a chaos marine – what is the probability that the chaos marine dies? Scribble down (or just remember) your gut instinct answer now, and check it against the results at the end, it may be quite different…

1d6 – What are the odds?

On a 1d6 roll you can get results from 1 to 6, and each result is as likely as any other i.e. ones are as likely as sixes (though sometimes it doesn’t feel that way!). Here’s a chart showing the odds:

1 2 3 4 5 6
= 16.67% 16.67% 16.67% 16.67% 16.67% 16.67%
< 0.00% 16.67% 33.33% 50.00% 66.67% 83.33%
> 83.33% 66.67% 50.00% 33.33% 16.67% 0.00%
<= 16.67% 33.33% 50.00% 66.67% 83.33% 100.00%
>= 100.00% 83.33% 66.67% 50.00% 33.33% 16.67%

This may look confusing at first, but let’s take a moment to examine the chart. The 1 to 6 across the top is the number on the die, and each row below shows the odds of a particular type of outcome.

The row starting with the = (equals) symbol is the odds of that particular result. So as we read across we see that all of them are the same odds (16.67% or 1 in 6, which makes sense if you think about it).

The row starting with the (greater than) symbol shows the odds of a result that is higher than the number at the top of the column. So, for example, the odds of getting greater than 3 on a d6 is 50%, which makes sense as half the possible results are higher than 3.

The row starting with the <= (less than or equal to) symbol shows the odds of a result that is equal to or lower than the number at the top of the column. So while the odds of getting a 2 is 16.67% (check the = row), the odds of getting a 2 or less is 33.33% (check the = (greater than or equal to) symbol. This shows the odds of getting a particular number or above. So the odds of getting a 3 or more on a d6 is 66.67%. This bottom row is the most interesting for Warhammer 40,000 as this is generally how we think of the game, e.g. 4 or higher to hit at BS3, or 3+ to wound on Strength 5 vs Toughness 4.

At this point you are either thinking ‘duh this is bloody obvious’ or you are utterly confused. Perhaps it’s time for an example.

A space marine shoots his bolter at a chaos marine. He is BS4 so he hits on a 3 or better (66.67% from our bottom row). The bolter is strength 4 and the chaos marine is toughness 4 so it’s 4 or higher to wound (50% from the bottom row). The odds of the chaos marine making his save is 66.67% as his save is a 3+. BUT if we want to calculate the probability of the kill, then we need to look at the odds of the chaos marine FAILING his save. To do that we simply look up the odds of him getting less than (<) 3, which our table shows as 33.33%.

How do we add it all up to get a result? Well for a start you don’t add them, you MULTIPLY them:

(odds of hitting) x (odds of wounding) x (odds of failing the save) = odds of kill

So based on our example above (66.67%) x (50%) x (33.33%) = 11.11%

But what about that opening question? There are 5 marines in rapid fire range of that lone chaos marine. So we get 10 bolter shots. Most players will multiply the odds of the kill (11.11%) for one shot, by the number of shots (10). This is wrong! the fact that it gives an answer over 100% should be your first clue (nothing can have odds greater than 100%).

So how do we work out the real answer? You have to look at the odds of the chaos marine surviving. The odds of him surviving one shot is 100% minus the odds of the kill (11.11%) so the odds of survival for one shot is 88.89%. The odds of him surviving all 10 shots is:

88.89% x 88.89% x 88.89% x 88.89% x 88.89% x 88.89% x 88.89% x 88.89% x 88.89% x 88.89%=30.79%

This means 10 bolter shots has (100%-30.79%) = 69.21% chance of killing that marine. So it’s quite likely, but definitely not certain!

Hopefully I’ve explained this all clearly – but if anything is unclear then say so in the comments section and I’ll clarify.

Next time I’ll cover the nuances of the 2d6 roll.

1 2 3 4 5 6
= 16.67% 16.67% 16.67% 16.67% 16.67% 16.67%
< 0.00% 16.67% 33.33% 50.00% 66.67% 83.33%
> 83.33% 66.67% 50.00% 33.33% 16.67% 0.00%
<= 16.67% 33.33% 50.00% 66.67% 83.33% 100.00%
>= 100.00% 83.33% 66.67% 50.00% 33.33% 16.67%

%d bloggers like this: