Tag Archives: 40k

More penetration: Ass versus Las

This weeks sandwich request comes from the inimitable Paul ‘Mandragoran’ Quigley (just back from Switzerland as part of the Irish team in the 40k world championships!). We’re taking another look at penetration today, this time factoring in the impact of rending. A useful reference point would be here where I’ve covered the efficacy of a variety of anti tank weapons, but the material in this post does stand on its own too. Right, question time:

A Black Legion tank commander is navigating his Land Raider through enemy territory. He’s caught in crossfire between two Razorbacks, one left, and one right. Both are at the limit of their weapon range, so the commander decides to rush towards one so that he can’t be hit by both. Should he drive toward the Assault Cannon armed Razorback, or the Lascannon armed Razorback?

So, rending against vehicles. You get your usual 1d6 plus weapon strength roll, with the added twist that if you get a 6 on the roll, then you get to roll a d3 and add it to your result. This means that an assault cannon at Str 6 could get a 15 and penetrate a Land Raider (Str6+roll a 6 on d6+ roll a 3 on d3 =15). The question is, can it do a better job than a Lascannon (which is a plain Str 9 + 1d6 with no rending)?

It’s a little tricky to do a straight like-for-like comparison here as a key feature of the assault cannon is that it gets four shots, whereas the Lascannon only gets one. So here’s my starting point. I’m assuming that there are no misses, and for the Lascannon I’m looking at the odds of a penetrating hit, and for the assault cannon I’m looking at the odds of at least one penetrating hit. Some of you may object to that approach, but bear with me for now.

(Just to note: the gap in the line isn’t a mistake, it’s simply that you can’t get a 12 on the assault cannon as rolling the 6 gets you an extra d3 making you jump from 11 to 13+).

So what have we got: one hit with a lascannon has a (just under) 17% chance of getting a pen on AV14, but 4 hits from an assault cannon gets you (just over) 17% chance of getting one or more penetrating hits on AV14. Okay the odds are only a tiny bit higher but you can get from one to four pens so the net effect can be a lot stronger. So the word on the street is correct, assault cannons are straight up better than lascannons at penetrating AV14?

Well, not so fast.

Let’s go back to those assumptions from earlier. None of the shots miss. “So what?” you say, “the assumption was the same for both!“. Actually it’s different. The odds of getting all hits on a one shot weapon are better than the odds of getting all hits on a four shot weapon (assuming equal BS). The analysis above assumes that the Razorbacks never miss, so the more unreliable the firer, the less accurate that graph becomes.

To illustrate the point I’ve run the same analysis showing the results for 4, 3, 2 and 1 hits on the assault cannon versus the lascannon.

The comparison is no longer quite so clear cut. We need to account for the end to end process from hitting through to penetrating. So lets’ do that. Lets assume BS4 for the assault cannon and the lascannon.

For the assault cannon we need:

  • 3+ to hit
  • 6+ to rend
  • 5+ to penetrate

This gives us a 4% probability of success. But we get 4 shots, if you’re thinking that 4 shots at 4% gets you a 16% probability of success then you probably need to read my blog more often; if you’re thinking the answer is 14% then you probably don’t need me at all. (Success here means one or more penetrate results)

For the Lascannon we need:

  • 3+ to hit
  • 6+ to penetrate

This gives us an 11% probability of success, and since we only get one shot, that’s the total odds.

So what’s the final verdict? The analysis clearly shows that neither the assault cannn or lascannon are particularly good at killing Land Raiders, but if they both have the same BS, the assault cannon is definitively better. It is worth noting that the lascannon can sneak ahead if fired by a superior marksman, so a BS5 lascannon is equal to a BS4 assault cannon, and a twin linked BS4 lascannon is better than a BS4 assault cannon (vs AV14).

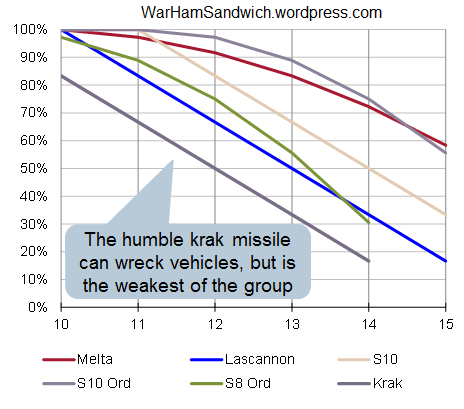
I say final verdict, but there’s still a little more gas in the tank. I’ve plotted a couple of different weapons so you can check out the relative merits of weapons that I haven’t covered previously. Note that I’ve not done the full end to end calculation here, I’ve simply assumed all shots hit for this chart.

One final weirdness I wasn’t quite expecting, against the humble rhino (AV11) the lascannon is more reliable. It’s basically an artifact of the rend: if you get a 6 then your result ‘jumps up’ out of line with the non rending results. So while we initially were concerned only with AV14, we can in fact make a more general statement: AV12 and above, assault cannon more lethal, AV11 and below Lascannon more deadly!


Ka-blammo!

I first touched on scatter dice in my earlier post on deep striking. Blast weapons don’t use Ballistic Skill in the same way as ‘regular’ weapons, but it is still an important factor in hitting your foes. Question time:

A renegade Ordo Hereticus Inquisitor carrying a psyocculum is hunting the battlefield for Mephiston. The inquisitor is joined by his trusty squad of psyker henchmen with the Psychic Barrage (large blast) power. Assuming they pass their psychic test, what are the odds that they will hit Mephiston?

Right, blast weapons use the scatter dice described here. At its most basic, a 33% chance of a hit, and 67% chance of a miss; if you miss then it scatters 2d6 inches but unlike deep striking you can subtract the firing models Ballistic Skill (BS) from the 2d6 result. So if you roll a ‘miss’ but get a distance less than or equal to your BS then that miss becomes a hit (i.e. you don’t scatter). Naturally this means that the higher your BS, the more ‘misses’ get converted into hits, and if it does scatter then it won’t scatter as far.

To show the effect of increasing BS values I’ve pulled together a 3d plot. So each colour represents a BS value, from BS0 at the front to BS10 at the back. The odds of a particular result go from left to right, so taking BS0 as an example, the odds of a HIT is the leftmost blue column (at 33.33%) and the odds of a particular scatter are to the right, e.g. a 2 inch scatter has a probability of 1.85% (for BS0) and a 7 inch scatter would be 11.11% likely (for BS0).

So quick summary on how to read this:

  • the height of a given column is the probability,
  • each colour is a BS value, and the BS values get higher as you go back,
  • the foreground numbers are a HIT (leftmost) or a particular scatter distance (from 1 to 12 inches).

Since the the BS value is subtracted from the scatter distance, you can clearly see the maximum scatter get smaller with each step increase in BS. So looking at the BS10 scatter (all the way at the back in pink) it’s a 94% chance of a hit, 4% chance of a 1 inch scatter, and a 2% chance of a 2 inch scatter.

Given that the the psyocculum gives our Psykers BS10, is that the answer to the question, a 94% chance of hitting Mephiston?

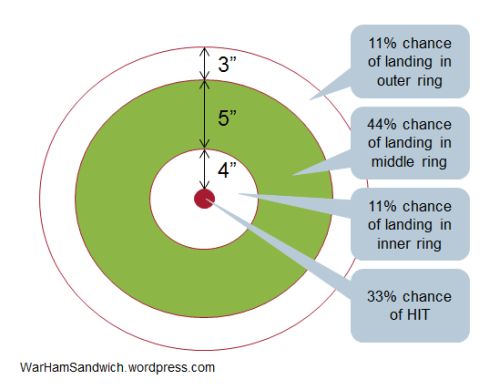
Not quite, theres one more factor to take into consideration. Blast size. The regular blast has a 1.5 inch radius, and the large blast has a 2.5 inch radius. Against a vehicle, only the centrepoint of the blast gets you a full strength hit, but against infantry just clipping the base with the blast template is enough for the full whack.

So in terms of hitting Mephiston, it’s 2d6 scatter minus 10 for BS, and (effectively) minus another 2.5 inches for the radius of the large blast. So we’re subtracting 12.5 from a number that is at most 12, simply put they can’t miss! There aren’t many mechanics in the game that can say that.

The only caveat is that the extra bit of reach from size of the radius doesn’t get you a ‘full’ hit as it doesn’t land exactly where you placed it. You’ll definitely hit the guy you were centred on, but you’ll cover different models around him if it does scatter those one or two inches.

So, back to more general principles. You may recall my uber list of BS rankings, well I’ve now we can add two new charts to that list.

First up, regular BS accuracies with blast accuracies added (in pink). The blast accuracies are the probability of hit but disregarding the radius of the blast (i.e. the odds of the centrepoint hitting your desired target point). Blue columns are ‘regular’ shots, green are twin linked, and pink are blast. Hmmm I guess I left out twin linked blast, guess that’ll have to wait.

Secondly looking specifically at the effect of the radius (no ‘normal’ i.e. non-blast shots on this one) . So these are the odds of hitting with just the centre (in pink), versus blast (in blue), versus large blast (in green).

The pattern is actually pretty simple: BS10 centre is as accurate as BS9 blast, is as accurate as BS8 large blast (and so on down). Essentially each step up in blast size is equivalent to a one point increase in BS.

So there you have it – I thought I had all the BS covered, but there was still more to do; …always more to do.


ETC 2011 DAY 2

As I mentioned yesterday, Warhammer 40,000 doesn’t quite have a world championship, but this role is at least partially fulfilled by the growth of the European Team Championship (ETC) to incorporate teams from all over the world, far beyond its European origin.

While it is a highly competitive international event, it’s important to retain some perspective, and ensure that all players enjoy the complete range of experiences on offer, as clearly demonstrated by Woody:

ETC 2011 finished in Switzerland today with the final three rounds of the two-day  six-round tournament.  What I’ll cover here is a brief round up of the results, mainly focusing on the performance of team Republic of Ireland, and team Northern Ireland.

NOTE: All results courtesy of TableTopTournaments

Here are the standings going in to day two:

OVERALL PLACING END OF DAY 1

Place Team Points Difference
1 Germany 6 184
2 Poland 6 144
3 Sweden 5 162
4 Italy 5 68
5 United States 4 100
6 Spain 4 46
7 England 4 40
8 Latvia 4 34
9 Wales 4 20
10 France 4 -6
11 Czech Republic 3 36
12 European Union 3 0
13 Switzerland 3 -10
14 Belgium 3 -28
15 Ireland 3 -58
16 Denmark 2 -12
17 Scotland 2 -16
18 Finland 2 -56
19 Norway 2 -94
20 Belarus 1 -38
21 Austria 1 -52
22 Northern Ireland 1 -144
23 Russia 0 -140
24 Greece 0 -180

How does this get shaken up by Day 2?

ROUND 4

Team A Team B Points TP
Poland Germanyvictory 0 : 2 57 : 103
Swedenvictory United States 1 : 1 82 : 78
Italy Spainvictory 0 : 2 73 : 87
Latvia Englandvictory 1 : 1 75 : 85
Wales Francevictory 0 : 2 41 : 119
Switzerlandvictory Czech Republic 2 : 0 86 : 74
Belgium European Unionvictory 0 : 2 62 : 98
Irelandvictory Denmark 1 : 1 84 : 78
Finland Scotlandvictory 1 : 1 77 : 83
Norway Belarusvictory 0 : 2 29 : 131
Austriavictory Greece 2 : 0 110 : 40
Northern Ireland Russiavictory 0 : 2 56 : 104

Team NI faced off Russia for their opening game, but the great Bear of Russia proved a difficult opponent.  Loss for Team NI.  Republic of Ireland looked like a victory mid game, but the Danes pulled back the draw.  Not a bad start for RoI, top half of the table!

Worth noting that this was the first ever loss in a round by Poland, so well done to the German team for that performance.  I’m sure there’s an inappropriate WW2 joke in there somewhere, but let’s just leave it at that.

ROUND 5

Team A Team B Points TP
Swedenvictory Germany 2 : 0 99 : 61
Polandvictory Spain 2 : 0 95 : 65
France United Statesvictory 0 : 2 61 : 99
Italy Englandvictory 0 : 2 74 : 86
Latviavictory European Union 2 : 0 112 : 48
Ireland Switzerlandvictory 0 : 2 55 : 105
Walesvictory Czech Republic 2 : 0 86 : 74
Austria Belarusvictory 0 : 2 74 : 86
Denmark Scotlandvictory 1 : 1 75 : 85
Finlandvictory Belgium 2 : 0 119 : 41
Norway Russiavictory 0 : 2 50 : 110
Northern Ireland Greecevictory 1 : 1 76 : 84

Team RoI faces the host nation, Switzerland, and lets them win out of sheer politeness.  Team NI get back on the horse with a hard fought draw against Greece.  Things are heating up at the top, with Germany, Poland and Sweden all on 8 points.

ROUND 6

Team A Team B Points TP
Polandvictory Sweden 2 : 0 103 : 57
Latvia Germanyvictory 0 : 2 47 : 113
England United Statesvictory 0 : 2 67 : 93
Switzerland Spainvictory 0 : 2 66 : 94
Walesvictory Belarus 2 : 0 100 : 60
Italy Francevictory 0 : 2 71 : 89
Finlandvictory European Union 2 : 0 90 : 70
Denmarkvictory Czech Republic 2 : 0 91 : 69
Russiavictory Scotland 1 : 1 83 : 77
Irelandvictory Austria 2 : 0 103 : 57
Belgiumvictory Greece 2 : 0 91 : 69
Norway Northern Irelandvictory – : 160

RoI took on Austria in the final round, but flight schedules meant the Austrians couldn’t stay the course and had to concede.  Not the way RoI would like to win it, but there you go.  Similarly Team NI got a walkover from Norway as they had to leave early.  A bit of a flat end, but the boys did us proud and hopefully they had a great time!

FINAL RESULTS

Place Team Points Difference
1 Germany 10 258
2 Poland 10 174
3 United States 9 160
4 Sweden 8 158
5 Spain 8 58
6 France 8 52
7 Wales 8 -6
8 England 7 36
9 Finland 7 36
10 Switzerland 7 24
11 Latvia 7 22
12 Denmark 6 -6
13 Ireland 6 -56
14 Belarus 5 36
15 Italy 5 24
16 Scotland 5 -6
17 Russia 5 -26
18 European Union 5 -48
19 Belgium 5 -120
20 Northern Ireland 4 -40
21 Czech Republic 3 -10
22 Austria 3 -40
23 Norway 2 -416
24 Greece 1 -264

Great performances overall from teams RoI and NI, and we hope for even better next year!  For excellent video coverage of the full event, check out RHQ.tv


ETC 2011 DAY 1

Warhammer 40,000 doesn’t quite have a world championship, but this role is at least partially fulfilled by the growth of the European Team Championship (ETC) to incorporate teams from all over the world, far beyond its European origin.

ETC 2011 takes place in Switzerland today (Saturday 20th August) and tomorrow (21st).  I’ll be doing a brief round up at end of both days, mainly focusing on the performance of team Republic of Ireland, and team Northern Ireland.

NOTE: All results courtesy of TableTopTournaments

ROUND 1

Team A Team B Points TP
Russia Belgiumvictory 0 : 2 66 : 94
Northern Ireland Austriavictory 1 : 1 78 : 82
Norway Latviavictory 0 : 2 57 : 103
Switzerlandvictory England 1 : 1 84 : 76
Scotlandvictory European Union 2 : 0 106 : 54
Spainvictory Czech Republic 2 : 0 113 : 47
Denmark Polandvictory 0 : 2 63 : 97
Germanyvictory Wales 2 : 0 120 : 40
Greece United Statesvictory 0 : 2 30 : 130
Italyvictory Sweden 1 : 1 82 : 78
Finland Irelandvictory 0 : 2 69 : 91
Francevictory Belarus 2 : 0 88 : 72

A good start for team Ireland, beating Finland in a close match up.  The first game of a tournament can really make or break players’ confidence and this got the whole team on a good footing.  The Northern Ireland team held their own against Austria, all to play for in round 2!

ROUND 2

Team A Team B Points TP
Germanyvictory United States 2 : 0 105 : 55
Spainvictory Scotland 2 : 0 97 : 63
Latvia Polandvictory 0 : 2 57 : 103
Irelandvictory Belgium 1 : 1 82 : 78
Switzerland Francevictory 0 : 2 59 : 101
Italyvictory Austria 2 : 0 86 : 74
Swedenvictory Northern Ireland 2 : 0 121 : 39
England Belarusvictory 1 : 1 79 : 81
Finlandvictory Russia 2 : 0 88 : 72
Norway Denmarkvictory 0 : 2 44 : 116
Czech Republicvictory European Union 1 : 1 83 : 77
Walesvictory Greece 2 : 0 108 : 52

A good start in Round 1 means a tough opponent in Round 2!  The RoI team faced off Belgium, and came away with a draw.  Another solid performance which puts them in a good position for Round 3.

Joe “Maynard” Cullen wore his lucky hat and beard, and it appeared to pay off getting 11-9 with his Chaos Marines against seer council Eldar:

Team Northern Ireland lost their way slightly in round 2 and were defeated by the Swedish team.

As a twist of fate, RoI would face Sweden next in Round 3, can they get revenge for their Northern brethren?

ROUND 3

Team A Team B Points TP
Germanyvictory Spain 2 : 0 107 : 53
Polandvictory France 2 : 0 112 : 48
Ireland Swedenvictory 0 : 2 38 : 122
Italyvictory Belgium 2 : 0 106 : 54
Denmark United Statesvictory 0 : 2 55 : 105
Latviavictory Scotland 2 : 0 97 : 63
Finland Englandvictory 0 : 2 55 : 105
Walesvictory Austria 2 : 0 97 : 53
Switzerlandvictory Belarus 2 : 0 92 : 68
Northern Ireland European Unionvictory 0 : 2 51 : 109
Russia Czech Republicvictory 0 : 2 32 : 128
Norwayvictory Greece 2 : 0 92 : 68

After a poor performance in Round 1, the Swedes were fighting hard to get back up to the top.  Team Ireland stood in their way at the end of day 1 but unfortunately got steamrolled by the Nordic Nightmare.  A harsh result for RoI, but tomorrow will be a chance to get back in the tournament.  Team NI suffered at the hands of the Merc term, they’ll need a good start tomorrow to lift their spirits!

OVERALL PLACING END OF DAY 1

Place Team Points Difference
1 Germany 6 184
2 Poland 6 144
3 Sweden 5 162
4 Italy 5 68
5 United States 4 100
6 Spain 4 46
7 England 4 40
8 Latvia 4 34
9 Wales 4 20
10 France 4 -6
11 Czech Republic 3 36
12 European Union 3 0
13 Switzerland 3 -10
14 Belgium 3 -28
15 Ireland 3 -58
16 Denmark 2 -12
17 Scotland 2 -16
18 Finland 2 -56
19 Norway 2 -94
20 Belarus 1 -38
21 Austria 1 -52
22 Northern Ireland 1 -144
23 Russia 0 -140
24 Greece 0 -180

Overall good start to the ETC for team Ireland with one win, one draw, and one loss.  Team NI didn’t get such a good start, with one draw and two losses.  Here’s the matchups for Round 4 tomorrow morning:

Team A Team B
Poland Germany
Sweden United States
Italy Spain
Latvia England
Wales France
Switzerland Czech Republic
Belgium European Union
Ireland Denmark
Finland Scotland
Norway Belarus
Austria Greece
Northern Ireland Russia

Ireland plays Denmark, and Northern Ireland plays Russia, best of luck fellas!


Going Deep

Deep striking is a high risk/reward technique that can get your units anywhere on the table, in one fell swoop.  But when things go wrong, they can go very wrong, and on more than one occasion I’ve lost a 225 point unit of Obliterators to a bad scatter.  For that reason I often take some 3 man chaos terminator squads so I only risk 105 points for a chance at a cheeky melta shot.  But how should I be placing them when I deepstrike?  Consider the following:

Chaos Lord Harleck Wynne faces a wall of Imperial Guard tanks.  He has to deepstrike his terminators, as any walking squad or vehicle will be wiped out as it approaches.  Where should his combi-melta armed Chaos Terminators be placed to minimise the risk of mishap? Where should they be  placed to maximise the chances of getting into melta range? Where should they be placed to get a balanced risk of mishap versus melta range?


Ok, so deep striking is governed by scatter dice.  It’s a 6 sided die with two ‘HIT’ faces, and four faces with an arrow.  Place your model where you want him, and roll.  If you get a HIT then you land on target, if you get an arrow, then you scatter 2d6 inches away in the direction indicated by the arrow.  Because the distance is governed by 2d6, the distance follows a pattern already described here such that results of 7″ are the most likely and 2″ and 12″ are the least likely.

The arrows complicate matters as they don’t comply with the discrete probability that I normally use for these calculations, but we’ll touch on that later.

So, with two HIT faces out of 6, we have a 33% chance of landing on target, and a 67% chance of scattering.  If we ignore direction for a moment, then we can take a look at the odds of how far you’ll deviate from your intended location:

That was pretty much as far as my analysis went until quite recently.  This approach clouded my thinking, as I saw it as a straight up question of distance, so I may as well get super close to the enemy as the ‘most likely’ scatter distance was 7″.  Case closed, right?

Wrong!

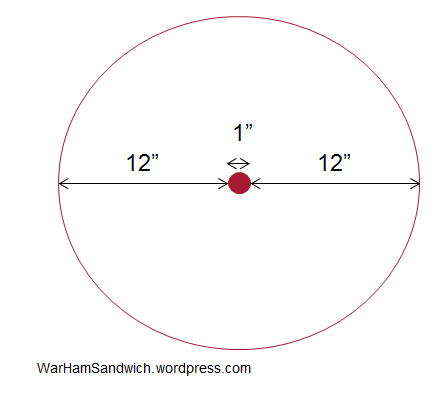
If you don’t get a HIT, then it’s all about the arrows.  Let’s imagine a model with a 25mm base put on the table in his desired deepstrike position.  He can scatter up to 12″ in any direction, so lets consider a 25″ wide circle as the total space we could end up in (e.g. up to 12″ to left + 1″base + 12″ to the right gives us the 25″, see below).

Time for a fancy graph.  So I plot an area of 25″ by 25″, and represent the probability of landing at a particular point as a height, so we we get a sort of mountainous terrain where the highpoints are where you are likely to land, and the lowpoints are where you are unlikely to land.  In the first instance lets look at the widest case.  So you have a 33.3% chance of landing on target (i.e. a HIT), and a 66.6% chance of scattering.  See below:

As you can see in terms of a single point, the target at the centre is far and away the single most likely final destination.  In fact the difference is so extreme that all you can see of the scatter is some light ‘fuzz’ in a ring around the centre.  So the first point to note is that if you do scatter it would appear that you could end up pretty much anywhere in that 25″ circle we described earlier.  But that’s not particularly enlightening, so lets take a closer look at the ‘fuzz’.

I now remove the HIT from the chart, and the scale can then be changed to show the variation in odds for the scatter results.  It’s worth noting that I didn’t solve this analytically so we don’t get a smooth and pretty set of results, we get a somewhat noisy set of peaks and valleys.  But it’s still good enough to gain some insights and is still essentially representative of how it works in reality.

So as you can see from the dark blue peaks, the most likely area to scatter into is a ring around the target point, (specifically a ring with its edges about 5″ to 9″ away from the target point).  This is an expected result from our knowledge that the scatter follows the same triangular shape of the old 2d6 chart.  Do note how low the odds of landing at any particular point is: about 0.2% to 0.4%, tiny!  Working through the numbers, here’s a simplified version:

So this is a lot of exposition and I haven’t addressed the opening question at all!  What about those terminators?

Based on the calculations above, I carved out the probability of landing in a ‘safe’ area depending on how far away you place the terminators.  But that in isolation is not enough.  We want the terminators to land within 6″ of the tanks to get some hot melta goodness going.  So here I’ve plotted the odds of landing safely for a given distance, and also the odds of ending up safe AND within melta range for a given drop point (i.e. the point you selected to drop at, not where you end up after scattering).  So on this graph the x-axis is the distance from the tank wall you place the model initially, (i.e. before rolling for scatter).

The results weren’t quite what I was expecting going in, though do bear in mind that these findings are only true for the specific set up of the question – this graph isn’t a general rule for all deep strike situations!

So, what does this show?  Well, assuming the parking lot of tanks is the only other unit in the area then unsurprisingly the further away you place them the less likely they are to scatter on to the enemy and mishap.  But playing it safe won’t necessarily get you within the all important 6″ melta range.  Here’s the interesting bit, I had originally thought that putting the terminators 1″ away from the tanks would get you the highest probability of being in melta range with a trade off of slightly higher odds of mishap.  But I was quite wrong.  The odds of getting safely in melta range stay pretty flat if you originally place the model between 1″ and 6″ away, but the odds of a mishap are about 45% at 1″ but fall to about 25% at 6″.  So the tradeoff I mentioned in my opening question, doesn’t really exist – you can play it (relatively) safe and still go for the close range shot.

Lesson learned, drop those terminators about 5 or 6 inches away and you’re playing the right odds.

So how about a more general rule of thumb then?  This specific case aside, how do we make better deepstriking decisions on the fly?  In my opinion, the best general approach is to think in terms of area.  Visualise the 25″ circle around any particular drop point (some assistance here and here), and then look at the friendly and enemy units in that circle.  Now imagine a 1″ buffer around enemy units, and try to estimate what fraction of the circle’s area is covered by all the units and that buffer.  This is key to estimating the risk.

I’ve illustrated a few simple examples below; in each case the centre of the circle is where you initially place the model (i.e. before rolling for scatter), and the red areas have units or other features (such as impassable terrain) that would cause a mishap (don’t forget the 1″ buffer around enemy units!).  Do note I’m assuming that the centre point is a legal placement.  Also note the maths below isn’t quite exact, but is good enough for tabletop guesstimation.

So there you have it – even deep striking right up into someone’s face is not quite as risky as it looks.

Tune in next time when I apply all of this to blast weapons…


Alpha Legion Operatives

As a change of pace, I’m foregoing probability for the sake of a proper hobby update.  My main army is Alpha Legion (using codex chaos space marines) but I really miss having the use of cultists as human operatives.  I’ve had a hankering to run a renegade guard list with Alpha Legion operatives for a while now, and with that in mind I’ve been slowly amassing some forgeworld renegades over the last 12 months.

The forgeworld models are fantastic and here’s what I’ve picked up so far.
9 enforcers Image

50 bods and 3 weapon teams Image
command squad Image

6 tank crew Image

7 psykers Image
Image

Obviously I’ll need to get a lot of vehicles to make a viable guard army, but I’m looking at using some fairly heavy conversion to set the army apart from a ‘normal’ Imperial Guard army.  More updates soon, and there are pictures available on the accompanying FaceBook page.


Stacking the Odds Part II

The previous post on the probabilities for making lots of saves generated a bit of interest, and (as usual) some clever readers pointed out scenarios that should bear further analysis.  Altmann from the Penny Arcade forums asked:

“Can you work in the probability of making 4+ feel no pains as well? I know we’re getting into NASA shit but I’m curious”

Followed by Joe “Maynard” Cullen (of WarHeads fame) who pointed out that some wargear items also add complexities:

“The Wolf Tail Talisman gives a 5+ invulnerable save that happens before the armour save”

So in a similar fashion to my ultimate Ballistic Skill chart, I took it upon myself to rank the performance of a variety of armour types with rerolls, with Feel No Pain (FNP), and just plain regular saves.  This will give some insight into the relative merit of the saving throws we normally encounter in 40k.

As with Stacking the Odds Part I, the chart shows how likely each type of save is to take no casualties from an increasing number of saves.

So chart number one:

This charts the various types of save (and combinations) showing the odds of taking no casualties for up to 6 saves (I cut it off at 6 as about half of them approach zero at this point).  The legend on the right shows the ranking from best to worst with a 2+ rerollable save being the best, and a regular 6+ save being the worst.  The sharper eyed in the audience may notice that some of the save types listed in the legend don’t show up in the graph – namely “5+ FNP” and “3+ FNP”.  Rest assured this isn’t an error, it is simply that they are coincidentally covered by other save types that perform identically.  So a 5+ with Feel No Pain save works out the same as a regular 3+ save, and a 3+ with Feel No Pain save works out the same as a regular 2+ save.

Or do they?

The calculations are correct, but you need to interpret the data in the context if the game itself.  So saving on a 5+ followed by a 4+ for FNP is statistically the same as a 3+, until you get hit by an AP5 or AP4 weapon, at which point all you get is the FNP, which is just a 4+ save (as you can see from the chart is a lot worse than a 3+).  The FNP could also be blocked by a high strength AP- weapon, leaving you with just a 5+.

In a similar vein, the 3+ with FNP is the same as a 2+, but what if they got hit by a battle cannon? the 3+ is negated by AP3, and (assuming we’re talking about T4 units) the FNP is negated by the instant death rule.  So no saves of any kind!  But a squad of terminators would still get their 2+ and (assuming that 5 are wounded by the blast) they have a 40% chance of taking no casualties at all!

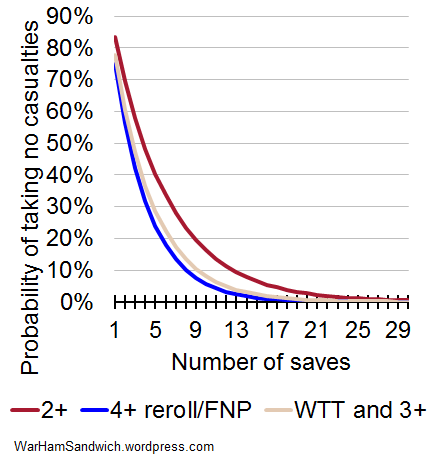
So what about those opening questions?  Well Altmann was interested in the effect of FNP on terminators, and to show the difference I’ve scaled the number of saves taken up to 30, and dropped the weaker save types.

The effect is actually pretty strong, if we take say 20 saves, a regular terminator squad has only a 3% chance of being unharmed while the FNP terminators have an 18% chance (again assuming that they aren’t hit by something that negates FNP!)

Joe’s suggestion of the Wolf Tail Talisman (WTT) is charted below. Assuming the squad has power armour, then it works out quite close to (but slightly better than) a 4+ reroll, and worse than a 2+ save.

This should let you compare the various save types available to you, but don’t forget the context of how saves and FNP get negated! If there are any other save types you want to see included, then please do leave a comment.


Poster Boy

As a quick break from the usual TheoryHammer, and just to show it’s not all about statistics, I’ve added some images to the resources section for those of you who are into terrain building.  It’s a set of miniature posters for the 40k/necromunda setting.

Gabriel_Pitt at the excellent Penny Arcade forums provided the source material – though he did mention that they apparently come from GW site (not that I can find them there now).

Here’s an example of how they were used in one of his terrain projects:

Downloads available here.


The Joy of Penetration

5th edition games often feature a lot of vehicles, and understanding how best to crack open that armour and feast on the goo inside can be a crucial skill for any player.  With that in mind, here’s a question:

After some poor manouevring by your normally brilliant tank commander, your shiny new Leman Russ gets hit by a Lascannon, and by a Battle Cannon.  Which is more likely to penetrate?

The ambush continues, and the Russ is hit by a Demolisher Siege Cannon, and a Multimelta at close range.  Which of these is more likely to penetrate?

For most weapons, armour penetration is relatively straightforward, i.e. weapon strength + D6.  So, for example, a Krak missile can get results from 9 to 14 (not bad against a Rhino, but smacks of desperation against a LandRaider).  However many of the best Anti-Vehicle weapons don’t follow such a simple pattern.

For example, ordnance weapons roll two dice and pick the highest to add to the weapon strength, and melta weapons at half range get to add 2d6 to the weapon strength. This produces results that aren’t as simple, and can have a couple of quirks.

How does this apply to our terrified tank commander?

The interesting thing about the opening questions, is that it depends on what side the tank is hit from.

Let’s take the lascannon versus battle cannon first.  For a rear shot (AV10) the lascannon is more likely to at least glance, but the battle cannon is more likely to penerate.  For a side shot (AV13) the battle cannon is more likely to at least glance, but the lascannon is more likely to penetrate.  From the front (AV14) the Lascannon is the clear winner and is more likely to glance, and more likely to penetrate.  Not that the lascannon is remarkable against AV14 (with <20% chance of penetrating) it’s more that the battlecannon can’t pen Av14 at all!

It wouldn’t be a WarHamSandwich without some charts so let’s take a look at the comparison.  The graph shows the odds of getting at least ‘X’ for an armour penetration roll with each weapon.  So to get the odds of penetrating AV13, we look at the 14 result as this gives us the odds of getting at least 14 (the 13 result would get the odds of at least glancing).

So we can see a crossover from 10 to 11, and from 13 to 14 where the relative efficacy of each weapon against that AV switches.

So what about that second volley of shooting?
Again it depends on the angle. The Demolisher is more likely to penetrate against side and rear, but once we get to the front this flips and the multimelta becomes more likely to penetrate.  The crossover is clearly shown in the chart, below.

So what’s the point Vanessa?  There certainly are some comparisons where you can unequivocally say weapon X is better at anti-vehicle than weapon Y, but often it’s not so black and white.  With a bit of analysis you can pick the best tool for the job at hand.  Here’s a comparison of some of the common anti-vehicle weapons so you can gauge the relative merits against various armour values.

That said, this analysis doesn’t look at the end-to-end process, from hitting to penning to what you get on the damage chart.  I guess that will have to wait for next time…


Size matters

One of my earlier posts talked about the importance of estimating range, and some techniques to help you guess distances on the fly.  Naturally I’m not the first nor the last person to have considered this part of the game, and I thought it might be useful to share some of the better articles I’ve seen on the topic.  Hopefully you can find an approach in the mix below that will help you on the field of battle:

http://waraltar.onthestep.net/2011/07/pythagoras-and-you.html

http://kirbysblog-ic.blogspot.com/2011/02/back-to-basics-eyeballing-distances.html

http://blood-claw.blogspot.com/2010/12/are-they-in-range.html

A further piece of work on my ‘to do’ list is to publish the dimensions of some fairly standard tabletop stuff.  This will help by giving some references on the board that you can use to estimate distance.  I’ve started here with standard base sizes:

When I get the opportunity I’ll add the dimensions of some common vehicles, e.g. Rhino, Landraider, Chimera etc and put them all up in a single document in my Resource section.

That’s all for now; I’ve been travelling round the world for the past while, but that should calm down from this October onward – so hopefully I can get back to a more regular update schedule!

PS if anyone has the time and inclination, then please do post up any vehicle dimensions that you know in the comment section, and I’ll collate them.


%d bloggers like this: