Monthly Archives: March 2011

Undo! Undo!

Sometimes things just don’t go your way.  We’ve all had that situation where you really wish you could do that roll again.  Thanks to wonders such as twin-linking, or lightning claws, sometimes we can.  Today we are talking about re-rolls, and (as is my habit) here’s a question:

A bolter shot hits and wounds a Warlock on a Jetbike, he needs to make a 3+ armour save to survive.  If the farseer had cast Fortune to give him a reroll on that save, how much more likely would he be to survive? and would he have been better off in Terminator armour instead?

Rerolls don’t change the range of possible results (i.e. 1-6) but they do change odds of a particular result.  I’m following the usual format for the percentage odds here so I won’t labour the discussion with what each row means.

1 2 3 4 5 6
= 2.78% 8.33% 13.89% 19.44% 25.00% 30.56%
< 0.00% 2.78% 11.11% 25.00% 44.44% 69.44%
> 97.22% 88.89% 75.00% 55.56% 30.56% 0.00%
<= 2.78% 11.11% 25.00% 44.44% 69.44% 100.00%
>= 100.00% 97.22% 88.89% 75.00% 55.56% 30.56%

Well actually … it is a little different this time so perhaps I should give some explanation to the more interesting bits.

  • The ‘equals’ row gives the odds of a particular result if you were to roll two dice and pick the highest.
  • The ‘less than’ row shows the odds of failing a particular result, e.g. theres a 25% probability of failing a 4+ (rerollable).
  • The ‘greater than or equal to’ row shows the odds of succeeding on a particular result, e.g. the odds of succeeding in a 5+ (rerollable) is 55.56%

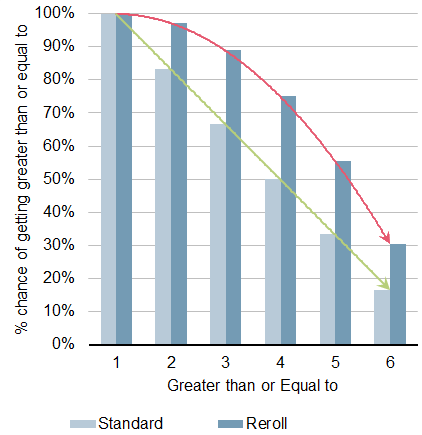
“So what?” says you.  In isolation it’s not that insightful, but if we compare it to the odds of a ‘normal’ (i.e. not re-rollable) outcome it gets very interesting.  The odds for a normal roll are covered here, but I’ve graphed the odds of success for normal vs rerollable to really show the difference.

Ok so the odds of getting a 1 or better is 100% in both cases … duhBut what about that Warlock from the beginning?

The jetbike Warlock has a 33.33% chance of failing that save (with no reroll).  If the Farseer has done his job and put Fortune on that Warlock, then the reroll brings the probability of failure down to 11.11%.  The reroll makes him three times less likely to fail! and what about that terminator armour? it has a 16.67% chance of failing that save – that’s twice as good as the basic Warlock, but one and a half times worse than the Fortuned Warlock!

A fortuned jetbike Warlock has significantly better saving throws than a Terminator with a Stormshield – think about that before you try gunning down a Seer Council.

Take a moment to really look at the chart.  The rerollable 6+ is almost as good as a basic 5+, and is about twice as likely as a normal 6+.  The 5+ reroll is better than a basic 4+, and so on until they converge at 1.  Also notice those trendlines I’ve added, the basic rolls get linearly less likely, but the rerolls stay high and then gradually fall off as you hit 6.

Of course, not all re-rolls are there to mitigate failure – sometimes you can be forced to reroll a success, but that analysis will have to wait for next time…

Retcon 2011

So here it is, the last tournament of the Irish season.

Retcon 2011 will set the final ranking positions of Ireland’s Warhammer 40,000 players, and will be the decider in who makes the national team for the ETC. It’s an open field, so I expect some hard fought battles.

The only stats I’ll be running in this post are the game results from round to round. I’ll be updating this post on the fly, thanks to my shiny new iPhone.

Round One:
Deployment: Pitched Battle
Mission: Seize Ground. 5 objectives, 4 to be placed in the centre of each table quarter and one in the very centre of the table

RESULT: 17-3 victory vs Eric Duffy and his Imperial Guard

Round Two:
Deployment: Spearhead
Mission: Killpoints

RESULT: 16-4 victory vs Pearce Condren and his Blood Angels

Round Three:
Deployment: Dawn of War
Mission: Seize Ground (5 objectives)

RESULT: 5-15 loss vs John Stowe and his Space Wolves

Round Four:
Deployment: Pitched Battle
Mission: Capture and Control

RESULT: 17-3 victory vs Shane porter and his Black Templars

Round Five:
Deployment: Spearhead
Mission: Seize Ground. (3 Objectives)

RESULT: 12-8 draw vs Michael Tangney and his Dark Eldar

Final result: 4th place (out of 33 players)


Two Dee Six

Now that we’re fully versed in the probabilities of the humble d6, let’s see what happens when we roll two of them together.  Yes that’s right, we’re talking 2d6 baby, yeah!

Ok, like last time I’ll kick it off with a question, actually this time it’s a couple of questions:

A squad of Chaos terminators has basic leadership 10.  In an epic career of 1,000 unmodified leadership checks, how many would you expect to fail?  Their Chaos marine brethren have leadership 9; if a squad of Chaos marines also had to take 1,000 unmodified leadership checks in their career how many would you expect them to fail?

On 2d6 we can get results from 2 to 12, but unlike the d6 scenario the results are not all equally likely.  The chart below follows the same format as this post so I won’t be as laborious in describing what each row means.  (Note I’ve rounded to one decimal place to keep the chart smaller).

2 3 4 5 6 7 8 9 10 11 12
= 2.8% 5.6% 8.3% 11.1% 13.9% 16.7% 13.9% 11.1% 8.3% 5.6% 2.8%
< 0.0% 2.8% 8.3% 16.7% 27.8% 41.7% 58.3% 72.2% 83.3% 91.7% 97.2%
> 97.2% 91.7% 83.3% 72.2% 58.3% 41.7% 27.8% 16.7% 8.3% 2.8% 0.0%
<= 2.8% 8.3% 16.7% 27.8% 41.7% 58.3% 72.2% 83.3% 91.7% 97.2% 100%
>= 100% 97.2% 91.7% 83.3% 72.2% 58.3% 41.7% 27.8% 16.7% 8.3% 2.8%

Ok, so the ‘equals’ row shows the odds of any particular result from 2 to 12, and as I noted above this is not the same for all results.  In fact it’s quite different; as an extreme example you are 6 times more likely to get a 7 as a 2.  7 is the most likely result, and results get less likely the further you go above or below 7 (so 2 and 12 are the least likely results at 2.8% each).  It’s worth noting that the odds of getting a 7 is 16.67%, which is the same odds as getting any particular result on a single d6 (i.e. the odds of getting 7 on 2d6 is one in six).  This means that while 7 is the most likely single result, there’s only a one in six chance of getting a 7 (clear as mud eh?).

What does this all mean in game terms? The most common use of 2d6 is for leadership checks of various types (there’s also scatter dice but I’ll cover those in a separate post in the near future).  Interestingly enough, while most of the time we hope for high rolls in 40k, for leadership we want to roll low.  So the most useful row in the above chart is the ‘greater than’ row; it gives us the odds of failing a leadership check for a given Ld value.

The odds of failing a leadership check decrease fairly rapidly as Ld increases, but what’s most interesting is the step changes at the higher end of the leadership scale.  In the long run, Ld9 fails twice as many leadership checks as Ld10; Ld 8 fails over three times as many times as Ld10, and Ld 7 fails five times as many times as Ld10.

Or to put it in absolute terms: Ld 9 fails one in six times (yes that includes you, Fateweaver), Ld 10 fails one in twelve times.

This gets us the answer to our opening questions fairly quickly.  The Chaos terminators at Ld10 will expect to fail 83 of their 1000 leadership checks, whereas the Chaos marines at Ld9 will expect to fail 167!  So in practical terms, for an unmodified roll, Ld10 is twice as good as Ld9. Adding an Ld10 aspiring champion to the Chaos marine squad means they would expect to fail half as many leadership checks.

That’s enough for now, any comments or questions welcome!


Take your chances

With the outcome of almost every ingame event determined by the toss of dice, a grasp of probability is an essential tool in Warhammer 40,000. How do you give yourself the best chances if you can’t work out the odds? This post will give you basics of the probabilities associated with common rolls. But for now, I’ll open with a question:

5 space marines rapid fire their bolters at a chaos marine – what is the probability that the chaos marine dies? Scribble down (or just remember) your gut instinct answer now, and check it against the results at the end, it may be quite different…

1d6 – What are the odds?

On a 1d6 roll you can get results from 1 to 6, and each result is as likely as any other i.e. ones are as likely as sixes (though sometimes it doesn’t feel that way!). Here’s a chart showing the odds:

1 2 3 4 5 6
= 16.67% 16.67% 16.67% 16.67% 16.67% 16.67%
< 0.00% 16.67% 33.33% 50.00% 66.67% 83.33%
> 83.33% 66.67% 50.00% 33.33% 16.67% 0.00%
<= 16.67% 33.33% 50.00% 66.67% 83.33% 100.00%
>= 100.00% 83.33% 66.67% 50.00% 33.33% 16.67%

This may look confusing at first, but let’s take a moment to examine the chart. The 1 to 6 across the top is the number on the die, and each row below shows the odds of a particular type of outcome.

The row starting with the = (equals) symbol is the odds of that particular result. So as we read across we see that all of them are the same odds (16.67% or 1 in 6, which makes sense if you think about it).

The row starting with the (greater than) symbol shows the odds of a result that is higher than the number at the top of the column. So, for example, the odds of getting greater than 3 on a d6 is 50%, which makes sense as half the possible results are higher than 3.

The row starting with the <= (less than or equal to) symbol shows the odds of a result that is equal to or lower than the number at the top of the column. So while the odds of getting a 2 is 16.67% (check the = row), the odds of getting a 2 or less is 33.33% (check the = (greater than or equal to) symbol. This shows the odds of getting a particular number or above. So the odds of getting a 3 or more on a d6 is 66.67%. This bottom row is the most interesting for Warhammer 40,000 as this is generally how we think of the game, e.g. 4 or higher to hit at BS3, or 3+ to wound on Strength 5 vs Toughness 4.

At this point you are either thinking ‘duh this is bloody obvious’ or you are utterly confused. Perhaps it’s time for an example.

A space marine shoots his bolter at a chaos marine. He is BS4 so he hits on a 3 or better (66.67% from our bottom row). The bolter is strength 4 and the chaos marine is toughness 4 so it’s 4 or higher to wound (50% from the bottom row). The odds of the chaos marine making his save is 66.67% as his save is a 3+. BUT if we want to calculate the probability of the kill, then we need to look at the odds of the chaos marine FAILING his save. To do that we simply look up the odds of him getting less than (<) 3, which our table shows as 33.33%.

How do we add it all up to get a result? Well for a start you don’t add them, you MULTIPLY them:

(odds of hitting) x (odds of wounding) x (odds of failing the save) = odds of kill

So based on our example above (66.67%) x (50%) x (33.33%) = 11.11%

But what about that opening question? There are 5 marines in rapid fire range of that lone chaos marine. So we get 10 bolter shots. Most players will multiply the odds of the kill (11.11%) for one shot, by the number of shots (10). This is wrong! the fact that it gives an answer over 100% should be your first clue (nothing can have odds greater than 100%).

So how do we work out the real answer? You have to look at the odds of the chaos marine surviving. The odds of him surviving one shot is 100% minus the odds of the kill (11.11%) so the odds of survival for one shot is 88.89%. The odds of him surviving all 10 shots is:

88.89% x 88.89% x 88.89% x 88.89% x 88.89% x 88.89% x 88.89% x 88.89% x 88.89% x 88.89%=30.79%

This means 10 bolter shots has (100%-30.79%) = 69.21% chance of killing that marine. So it’s quite likely, but definitely not certain!

Hopefully I’ve explained this all clearly – but if anything is unclear then say so in the comments section and I’ll clarify.

Next time I’ll cover the nuances of the 2d6 roll.

1 2 3 4 5 6
= 16.67% 16.67% 16.67% 16.67% 16.67% 16.67%
< 0.00% 16.67% 33.33% 50.00% 66.67% 83.33%
> 83.33% 66.67% 50.00% 33.33% 16.67% 0.00%
<= 16.67% 33.33% 50.00% 66.67% 83.33% 100.00%
>= 100.00% 83.33% 66.67% 50.00% 33.33% 16.67%

Going the distance

Starting with the simple stuff.

For the game of Warhammer 40,000 the normal play area is 6′x4′, more usefully in inches 72″x48″.

Most of the game activities revolve around actions that depend on distance (e,g, moving, shooting, assaulting) and these actions almost always have distances that are 6″ or a multiple thereof (e.g. 6″ moves, d6″ run, 12″ rapid fire etc). So, before the game starts, it is useful to imagine the tabletop in 6″x6″ squares (so the playing area will be 12 squares wide by 8 squares deep).

This grid will guide your judgement of distance

This will help gauge weapon ranges, how long it will take to get from point A to point B etc. It won’t give accurate results, but it will give you a ballpark, and will let you know if something is definitely impossible. It’s inexact because a) you’re guessing, and b) most of what you do will be diagonal – so the orthogonal distances that square counting gets you won’t be right.

To overcome A requires experience, good spatial reasoning, and some practice (ie set up a tabletop and guess the various ranges, measure and see how you did).

To overcome B I’d suggest the following – imagine the rectangle that has one corner on your starting point, and the opposite corner on your end point. Add the longest side of the rectangle to half the shortest side and you will get a good approximation of the true distance.

So when assessing the battlefield, consider the deployment zones, terrain, and objectives – imagine your 6″x6x grid and start to consider what you can do, not just in this turn – but right through to game end. Just as an example, say at turn 2 you want to decide which units to send to which objectives; it is easy to underestimate how long it will take to get there – the grid will let you know if reaching that point is possible at all within the time available. For example a footslogging unit walking on turn 1 in a dawn of war scenario will not be able to make it to the opponents edge of the table even if they go in a straight line with no obstacles – unless they forego shooting for running.

Before the game starts, and during every turn, look at distances and consider them in terms of game turns to get there, or ranges required to shoot there, etc etc. Look at your opponent’s position and do the same to gauge what he can do, and what he may be going for. Don’t forget to use legal measurement to check your estimates during the game, for example movement and range after declaring shooting (yours and your opponents!)

Now stop reading this, and go practice eyeballing the tabletop.


%d bloggers like this: